The 2.8 Release is going to be a big step forward for Blender. If you follow Blender Development you already know how features like Eevee, Workspaces, and the Asset Management Engine will greatly increase how useful Blender will be.
There is one feature that hasn’t been talked about as much, and that feature is Application Templates. This was introduced in the 2.79 release and allows developers to configure blender to do something specific really well.
Read this post if you would like to know more about application templates.
Everything you need to know about Application Templates
Blender Pro
Blender Pro is an application template that was created to not only make blenders interface easier to use, but more importantly make it more efficient for advanced users.

This is still in development but can be installed into Blender 2.79. The rest of this article will describe how it it currently works as well as explain goals for future development.
The 3D Viewport
The 3D viewport is one of the most important space types in blender, so displaying as much of it as possible allows you better focus on your design.
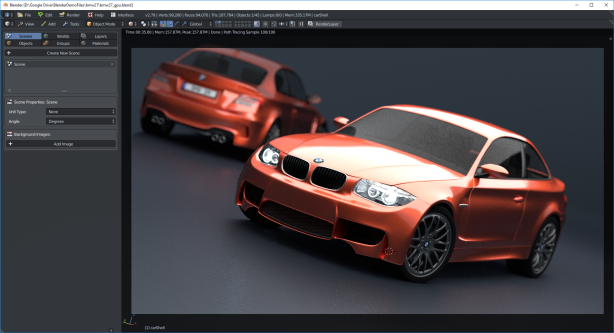
There are two shelves docked on the left and right of the interface. These interfaces are typically accessed with the T and N keys, and allows us to store the majority of of the commands and properties that need to be accessed.
The Main File Header
In 2.8, Blender will include a header that allows you to access common file commands like open, and save. As well as tabs to switch between different work spaces.

The main file header is still in development and will be available in 2.8
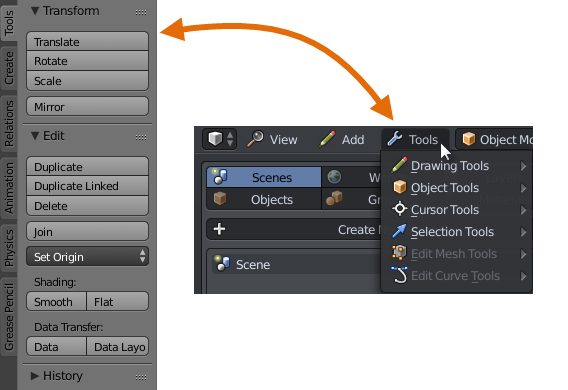
The Tool Shelf
The Tool Shelf currently stores tools for the current selection mode, but the tools that are displayed in Object Mode are not used that often because most of Blenders commands are accessed with hotkeys.
These tools have been moved to the header giving the user one location to find all of the available commands, and the hot key associated with it.
While in Sculpt or Texture Paint Mode these interfaces will still be displayed, as they are very useful.

Now that the tool shelf is free while in object mode we can display common types of data. This is information that you would typically access in the properties interface or in the outliner.
Scene – The scene tab displays all of the scenes in the file and the ability to create, remove, and edit the properties of the active scene.
The background images have also been moved here as well.

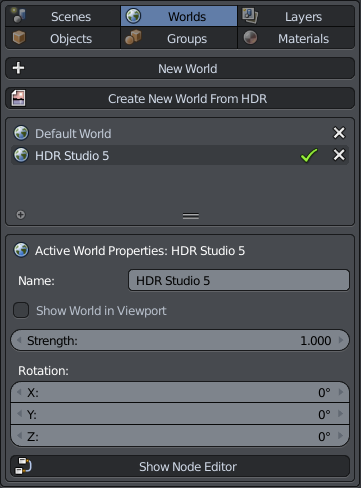
World – The world tab displays all of the worlds in the file, the ability to switch the active world, and the ability to access the common properties of the world.
Since the process of including an HDR world environment is time consuming there is a simple command that allows you to select an HDR and have it automatically create the node setup.
Layers – Layers are going to be completely redesigned in 2.8 so this is going to change drastically, but for now this displays the layer manager add-on.

Objects – It’s helpful to be able to see a list of all of the objects in your scene, but this interface also includes the ability to add objects using the standard add object menu as well as accessing your object library.

Groups – The Groups tab allows you to select a group from your library and append that to your scene. You can also create groups in this interface by selecting the objects you want to make a group and clicking the Make Group from Selection button.
Once a group is selected in the list you will be able to see the list of objects assigned to that group in the list below.

Materials – All of the scenes materials are displayed here as well as the ability to add one from your library. Once you select a material from the library you can use the assign the material by selecting an object.

For more information about the library management features. Read this article:
Blender Pro – Library Management
The Properties Shelf
The properties shelf is located on the right side of the 3D viewport and can be accessed with the ‘N’ Hotkey. By default, the majority of the properties that are stored in this interface are settings for the 3D viewport.
Since these aren’t accessed on a regular basis, the viewport settings have been moved to a dialog box in the view drop down menu.

Since we have removed a bunch of interface elements from the properties shelf we can now use this specifically to hold the properties for the currently selected object.
These properties are typically stored in the properties space.

As you can see in the image above the number of tabs that need to be displayed has been reduced. This was done by combining the modifiers, particles, and physics interface.
Particles and Physics are applied to objects just like modifiers, so including them in the modifiers tab simplifies the interface.
There is still more development that needs to be done to include all of the needed settings, but with a bit more work the interface can be displayed in an intuitive way.

Some modifiers can be assigned a texture. Rather than having a separate texture panel, the properties for the texture can be included in the same interface.

Use Dialog Pop-ups
In order to not overwhelm new users and to streamline the interface for advanced users. Pop-up dialog boxes are used to store properties that aren’t accessed on a regular basis.
For example the Render settings that typically take up a good portion of the interface, have been moved to the render drop down menu.

Moving them to a dialog box cleans up the interface.

Moving Forward – The Next Steps
Blender Pro is in very early development, and will continue to be developed along side 2.8.
This article just covered the default work space. There still needs to be work done for the Animation, Scripting, Compositing, and Texturing spaces.
Check back on this website for future updates, and please let me know your thoughts about this. If you have any ideas or something that you want included in this project then let me know.

The very first impression – why isn’t it default? Great work and UI changes. Like it very much. I’ll try to make next archviz for my clients with BlenderPro and I’ll tell you more. Keep up the great work!
LikeLiked by 1 person
What Artur said. And thank you!
*hurries off to download this thing*
LikeLiked by 1 person
This reminds me somewhat of a combination of Blender Sensei, Alchemy, Zero Brush, and Asset Management,
I have never cared much for the tabs. While a great concept, there wasn’t a way to customize them in to fit my workflow. Your menu is better, but I still wish I could customize menus to the way I work. Also new addons added new tabs with one tool in it–a waste of space.
I like the way you’ve included all the steps needed to do common tasks that require mulitple steps in the standard UI. Zero Brush and Alchemy do similar “bundling” of steps. I like the Alchemy (Sensei) handles special effects for particles and microdisplacement. I also like the way Zero Brush (also Sensei) allows you to panit without UVs and the way it handles layers for painting, and being able to switch easily between different types of painting on different paint layers.
I wish Blender had better textrure paint tools along the lines of Substance Painter with access to smart materials, particle brushes (not particle system), and layers with masks.
But here are a couple of ideas for you:
1) Currently you can drag and drop blender files into the viewport. That’s a great idea. But I’d like to also be able to drag and drop objects that currently much be appended or imported. For example, I’d like to be able to drag a blender file to a special Append / Link Icon and be able to pick what objects, materials, etc. from it directly.
2) I’d like to be able to drag and drop objects from my reference libraries that have extensions such as obj, fbx, stl, dae, 3ds, etc. directly into the viewport. It seems to me that Blender should be able to recognize an import extension and activate the approriate import option and place it directly into the viewport rather than having to open the export option, navigate to wherever the file is and then import it one at a time.
3) When importing objects, I’d like to import more than one at a time. There are reference models that have dozens of separate obj, 3ds, fbx, etc. files and currently I have to import them one at a time. I should be able to either import all selected objects, or better drag all selected object directly into the viewport.
4) I’d like to see an integrated Blender to Substance Painter option that establishes a link between Blender and substance painter so that I can see the results in Blender whenever I save the substance painter UV’s I’m working on and send Blender modeling updates directly to substance painter. The current back and forth steps are time consuming just to be able to see texture updates in painter displayed in Blender, and Blender changes reimported into painter.
Finally, I’d like to see more considation of steps for common tasks. For example, Sensei Alchemy has a fog and fire brush that sets everything you need up to simply paint where you want the fog or fire (smoke, etc.). No having to do 10 steps to get the same results in the standard modifier procedures. I also like the way Sensei allows me to put a # in the material name and it automatically sets it up to for microdisplacement of the material. Very handy. These are the kind of innovations I wish the Blender team would take 6 months to a year and just improve what they already have instead of adding new feature with more steps. Looks like 2.8 will solve some of those problems, but I think most developers think like geeks instead of users and so the number of steps it takes to do something isn’t a big deal for them. I shouldn’t have to remember all the different steps it takes to activate microdisplacement.
Anyway, great job. You’ve put a lot of thought and effort into this project. I am concerned that like Blender Sensei, once a user adopts this UI, what happens when the developer moves on and there are no more updates. I’ve seen that happen with almost ever addon. It gets abandoned and eventually becomes useless as Blender makes it’s standard updates.
These unique Blender UI’s also make it harder for new users to follow existing tutorials because the buttons and options no longer have obvious relationships.
Best of luck.
LikeLiked by 1 person
Thanks for the feedback. You mentioned a lot of great ideas. I haven’t looked into zero brush or alchemy yet, but sounds like they have a lot of great tools. Thanks again for the info.
LikeLike
Your work is simply amazing! I have been a heavy user of the Video Sequencer Editor for ten years I think, and some time ago I have made some ui proposals to improve its usability. I have noticed that you didn’t change the VSE yet, so maybe some ideas can be useful to you.
Right Click Select thread:
https://blender.community/c/rightclickselect/zcbbbc/
LikeLiked by 1 person
Video editing is something that I am interested in. Thanks for the info I will look into it!
LikeLike
Hey there! I just discovered your system today. I love how you have minimalized and combined features. It reminds me of the work I have been trying to help with Bforartists for a year now and all the work they’ve done with that fork. They also have done some core changes to the UI defaults of Blender as a fork. I was wondering, want to collab up some concepts?
I would love to get more involved with your ideas, maybe even try propose them for 2.8 development of the fork of 2.8 with more focus on UI.
I’ll try out your template, take a look at the code – and.. I highly recommend you also check out Bforartists and the 3 years work they did there. I like what you propose, and hope that these ideas will become a consisten theme for future Blender defaults and development. You have your head on right!
LikeLiked by 1 person
Thanks for the information. I will look into Bforartists for sure.
LikeLike
I’ve been using blender for a while. and I had become accustomed to its interface. However I must congratulate you since you have managed to make the use of blender easier and friendlier. Hopefully, do not give up on this project and for version 2.8 you will make a new version of this wonderful template. THANK YOU.
LikeLiked by 1 person
Hello, I also opened a topic for discussion on that here, if you would like to have a look and post your comment below.
https://devtalk.blender.org/t/blender-2-8-ui-feedback/558
LikeLike
I like and agree with what you posted. It’s interesting to hear from someone who designs cockpit electronics. Thanks for posting the link.
LikeLike